
- /
- /
- /
Create a new class
To Create a Class Click here.
Step 1 : Click Classes ![]() from left side navigation bar.
from left side navigation bar.
Step 2 : Click ![]() button from the page or select Add Class from + symbol drop down in the top header bar.
button from the page or select Add Class from + symbol drop down in the top header bar.
Step 3 : It will open a Addclass screen.
Prerequisites : Location, Room, Instructor, Category, Sub-Category, Session are need to be filled in the configuration tables to select those fields from the drop down in Class creation page.
Required Values : Class Name, Location Name, Type of Program, Type of Subject, Session,Class Start Date, Class End Date, Days (Mon,Tue, Wed, Thurs,Fri,Sat,Sun), Max Size, Registration Start Date, Registration End Date Tuition Label and Price.
Step 4 : Enter Class name.
Step 5: Select Location name, Room, Instructor, Type of Program, Type of Subject, Session from the drop down wherever applicable.
Step 6 : Enter Class Start date, Class end date, start time, end time, days.
Step 7 : Once the Admin selects the location and class dates Class Holiday Schedule will open. the holiday which is added for the location is added to the class. Admin can also add extra holiday for the class by clicking Add Extra Holiday button.

The classes will be shown in the dashboard calendar, if there is a Holiday then the day will be shown as a Holiday in the Class Calendar.

Step 8 : Enter Class maximum size, Max wait if applicable.
Step 9 : Select Class grade level (minimum and maximum grade levels) if applicable.
Step 10 : Enter registration period start date (by default it is the current date, which can be modified), and enter registration period end date.
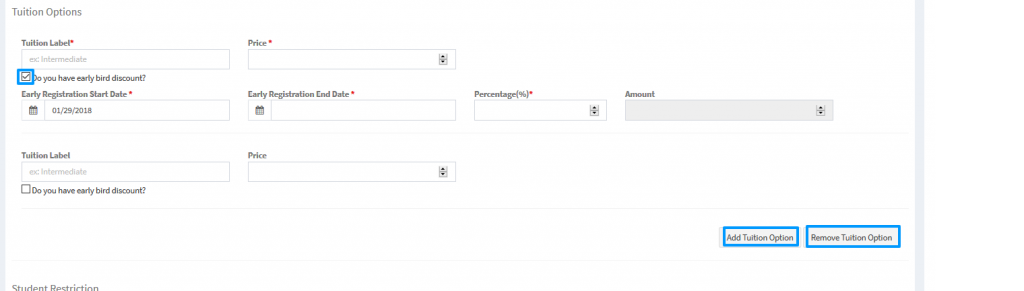
Step 11 : Enter tuition label and price, if the class has early bird discount, then click “Do you have early bird discount?” check box to enter the early registration start date, end date and the percentage of discount applied on the tuition fee. Amount gets populated automatically.
To add another tuition label and price Click Add Tuition options button, for this second tuition option also we can set early bird registration discount. to remove click Remove Tuition Options button.
NOTE : Enter Tuition price before entering the early registration discount percentage, so that amount gets calculated automatically. At Least one tuition label and price is a required for a class.
Step 12 : If the class has any gender restriction for enrollment then select gender drop down and select male / female otherwise by default no gender restriction is applied to the class.
Step 13 : If the class has any age restrictions between then select Age from the Age restriction drop down, it will show a Minimum age and maximum age fields to enter for the class.

Step 14: If the class needs to be linked to any add-on products then click assign Add checkbox, it will list all the product categories, select the category which needs to be added to the class. Then select the products from the list opened.
Note :The product categories and the products need to be added in the application.
Select catalog from navigation bar -> Categories -> Add Category, then select Products -> Add Product -> and link to the category added from right side list.


Step 15 : Image Upload : Class image can be uploaded from here to display it for the family in the class information.
Step 16 :Display on Web page & Allow web registration.

If display on website is yes, then the class will be displayed on the website other wise it will not display the class in public page.
If allow web registration is set to yes then it will take the registration start date as the date from the user to enroll the class using the enroll button otherwise it will show message entered by the admin and enroll button will not be displayed.

Then if the class needs to be displayed on website then select yes, otherwise select no. If the family can enroll to this class from web then select yes for Allow web registration field otherwise select no. Description Field to enter description for the class. Then Click Save to save the class. Or Click Save & Add New to save the entered class and add another class. Or click cancel button to cancel the entered class details.
Note : Class start,end or registration start, end or early registration start, end or class drop dates dates cannot be past dates.
Add Class Form :
![]()